Plugins
Plugins are under active development. We will be adding more plugins very soon.
Plugins extend the Gram Elements library with custom rendering capabilities for specific content types. They allow you to transform markdown code blocks into rich, interactive visualizations and components.
How Plugins Work
When you add a plugin:
- The plugin extends the system prompt with special instructions for the LLM to follow when generating code blocks for certain queries
- The LLM returns code blocks marked with the plugin’s language identifier
- The plugin’s custom component renders the code block content
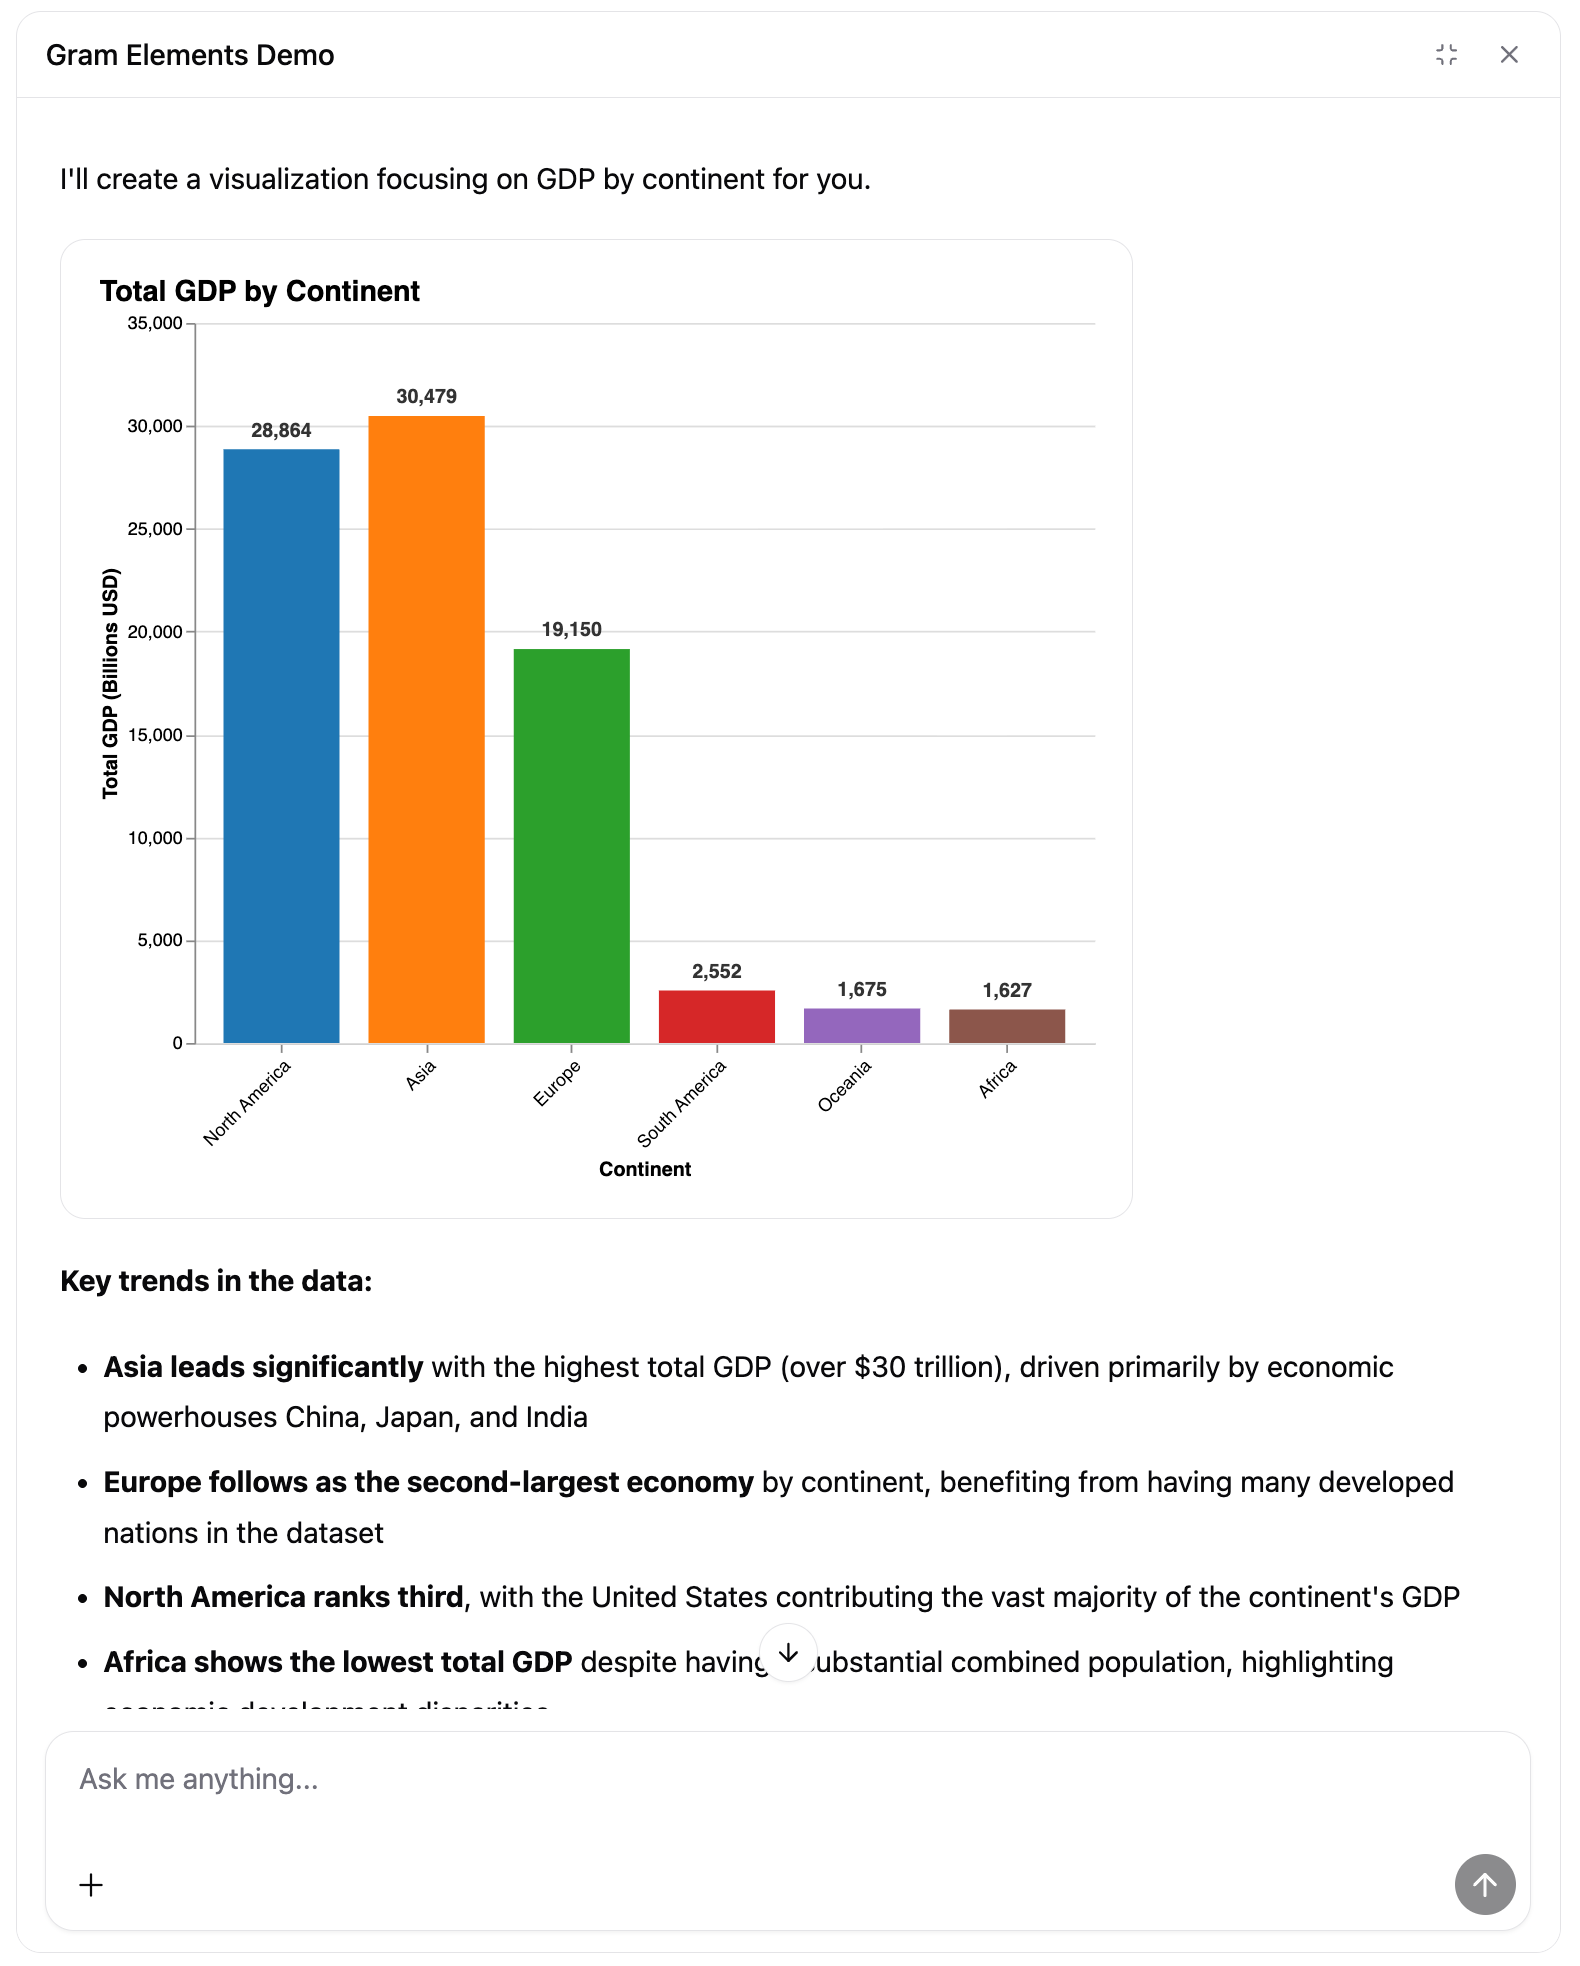
For example, the built-in chart plugin instructs the LLM to return Vega specifications for visualizations, which are then rendered as interactive charts.
Using Recommended Plugins
Gram Elements includes a set of recommended plugins that you can use out of the box:
import { GramElementsProvider, Chat, type ElementsConfig } from '@gram-ai/elements'
import { recommended } from '@gram-ai/elements/plugins'
import '@gram-ai/elements/elements.css'

const config: ElementsConfig = {
  projectSlug: 'my-project',
  mcp: 'https://app.getgram.ai/mcp/my-mcp-slug',
  welcome: {
    title: 'Hello!',
    subtitle: 'How can I help you today?',
  },
  // Add all recommended plugins
  plugins: recommended,
}

export const App = () => {
  return (
    <GramElementsProvider config={config}>
      <Chat />
    </GramElementsProvider>
  )
}
Available Recommended Plugins
chart- If a user requests a chart or any other kind of visualization, automatically renders interactive charts within the chat window. Uses the Vega library to render the charts.
The chart Plugin
The chart plugin is a simple plugin that renders charts based on the user’s request. It uses the Vega library to render the charts.
import { chart } from '@gram-ai/elements/plugins'

const config: ElementsConfig = {
  plugins: [chart],
}
Example output:
Using Individual Plugins
You can also import and use plugins individually:
import { chart } from '@gram-ai/elements/plugins'

const config: ElementsConfig = {
  // ... other config
  plugins: [chart],
}
Using Custom Plugins
You can create your own custom plugins to add specialized rendering capabilities:
import { GramElementsProvider, Chat, type ElementsConfig } from '@gram-ai/elements'
import { chart } from '@gram-ai/elements/plugins'
import { myCustomPlugin } from './plugins/myCustomPlugin'
import '@gram-ai/elements/elements.css'

const config: ElementsConfig = {
  projectSlug: 'my-project',
  mcp: 'https://app.getgram.ai/mcp/my-mcp-slug',
  welcome: {
    title: 'Hello!',
    subtitle: 'How can I help you today?',
  },
  // Combine built-in and custom plugins
  plugins: [chart, myCustomPlugin],
}

export const App = () => {
  return (
    <GramElementsProvider config={config}>
      <Chat />
    </GramElementsProvider>
  )
}
Creating Custom Plugins
The Plugin interface is very simple:
interface Plugin {
  /**
   * Any prompt that the plugin may need to add to the system prompt.
   * Will be appended to the built-in system prompt.
   *
   * @example
   * ```
   * If the user asks for a chart, use D3 to render it.
   * Return only a d3 code block. The code will execute in a sandboxed environment where:
   * - \`d3\` is the D3 library
   * - \`container\` is the DOM element to render into (use \`d3.select(container)\` NOT \`d3.select('body')\`)
   * The code should be wrapped in a \`\`\`d3
   * \`\`\` block.
   * ```
   */
  prompt: string

  /**
   * The language identifier for the syntax highlighter
   * e.g mermaid or d3
   *
   * Does not need to be an official language identifier, can be any string. The important part is that the
   * prompt adequately instructs the LLM to return code fences marked with the specified language / format
   *
   * @example
   * ```
   * d3
   * ```
   */
  language: string

  /**
   * The component to use for the syntax highlighter.
   */
  Component: ComponentType<SyntaxHighlighterProps>

  /**
   * The component to use for the code header.
   * Will be rendered above the code block.
   * @default () => null
   */
  Header?: ComponentType<CodeHeaderProps> | undefined

  /**
   * Whether to override existing plugins with the same language.
   * @default false
   */
  overrideExisting?: boolean
}
Here is an example of a custom plugin that renders a table based on the user’s request:
import { z } from 'zod'
import type { Plugin } from '@gram-ai/elements'

const tableSchema = z.object({
  data: z.array(z.record(z.string(), z.unknown())),
  columns: z.array(
    z.object({
      id: z.string(),
      header: z.string(),
      accessorKey: z.string().optional(),
    })
  ),
})

const TableComponent = ({ code }: { code: string }) => {
  try {
    const parsed = tableSchema.parse(JSON.parse(code))
    return <table>{/* Your table markup here */}</table>
  } catch (error) {
    console.error(error)
    return <div>Invalid table data</div>
  }
}

export const tablePlugin: Plugin = {
  prompt: `
  If the user asks for a table, return a code block marked with the \`table\` language. Return the data in JSON format matching the following schema:
  - data: array of objects where each object represents a row with dynamic key-value pairs
  - columns: array of column definitions with id (unique identifier), header (display name), and optional accessorKey (property name in data)

  Example:
  {
    "data": [
      { "name": "Alice", "age": 30, "city": "New York" },
      { "name": "Bob", "age": 25, "city": "San Francisco" }
    ],
    "columns": [
      { "id": "name", "header": "Name", "accessorKey": "name" },
      { "id": "age", "header": "Age", "accessorKey": "age" },
      { "id": "city", "header": "City", "accessorKey": "city" }
    ]
  }`,
  language: 'table',
  Component: TableComponent,
}
Last updated on